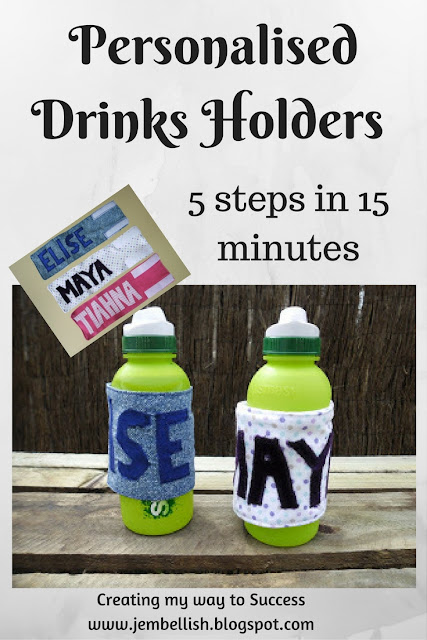
These drinks holders are perfect for outings, parties and
get-togethers. They fit around most drinks bottles or cups and help your kid remember which is their drink!
get-togethers. They fit around most drinks bottles or cups and help your kid remember which is their drink!
Best of all, they are small and flat and slip easily into your bag to take with you!
Would you like to make one of your own?
Here's how:
Step 1.
Cut 2 rectangles of fabric - 30cm x 10cm (12" x 4")
and two pieces of stitch in velcro 8cm (3.25") long.
Plus personal embellishment!
I chose to add names - for which I used scrap material, vliesofix (fusible webbing) and cut out the letters to iron on. I like to stitch around the edge of my finished applique for extra strength!
You could use any embellishment you choose - buttons, fabric flowers or none at all - the fabric you choose may be distinctive enough to remember which drink is yours!)
Step 2.
Attach your embellishment, and pin and stitch on the velcro pieces like this:
Step 3.
Place the rectangles right sides together..
And pin all the way around, then stitch,leaving a small gap to turn out when you're done.
Step 4.
Trim all four corners, then turn out through the gap you left in your stitching.
Step 5.
Iron flat, then top stitch all the way around the rectangle, as close to the edge as you can.
DONE!
Now you can wrap your drink holder around your bottle !
Great if your kids drinks bottles look the same....
And for over 100 more free sewing tutorials for all levels of sewing ability, visit My Free Tutorials Page.


What a great idea. My kids are older now, but my grandkids would love these!
ReplyDeletefantastic idea.thanks for dropping ur comments in my blog
ReplyDeleteI LOVE this - heading into my sewing room!
ReplyDeleteOh man I can't sew! I want to do this!
ReplyDeleteThanks for following La-La's daycare,following you back.
Lori
What a great idea! I love it!
ReplyDeleteThese are a really great idea Jill. Thank you. :)
ReplyDeleteRally good and implementable way to prepare wonderful bottle wrappers. Thanks for sharing.
ReplyDelete-polycarbonate glasses
What a cute way to personalize them! Looks great! I'm visiting from New Nostalgia! I'd love for you to share this with my {re}create into something new blog party too at http://notsosimplehousewife.blogspot.com/2011/07/recreate-into-something-new-3.html
ReplyDeleteHope to see you at my place soon!
Kaitlin-The Not So Simple Housewife
http://notsosimplehousewife.blogspot.com
This is such a fab Idea.. Thanks for sharing...
ReplyDeleteThose are great, and they look easy enough a teen could make them!
ReplyDeleteI run Fun Family Crafts, a library of craft tutorials geared at kids of all ages. I would love it if you'd stop by and submit this to be featured! (I link to you, I don't post your tutorial on the site) Feel free to submit as many kid friendly craft tutorials as you like! http://funfamilycrafts.com/
loved this , you should add it to our link party
ReplyDeletehttp://mountaintopchef.blogspot.com/2015/09/friday-finds-1.html
Thanks Nadia!
Delete